Optimizing the last 20% of the new site's design
I just finished designing another version of my site, which I’m really happy with! The big changes were:
- Real, god-honest typesetting. The fonts used are Inter and Source Serif Pro. Essential Type Helped me get a better understanding of typography, and some pointers for what I was looking for.
- Using my Font Awesome Pro license on this site, because it was just sitting there.
- Using CSS variables for managing colors & typesetting. This allowed me to quickly add Dark mode support, and everything is vanilla CSS!
- Updating the syntax highlighting to match what I actually use, Base16, specifically “Mexico Light” in the daytime, and “Porple” at night
However, I noticed it was slow on my morning walk today. So I ran the new design through Page Speed Insights, and there were some real bottlenecks it identified:
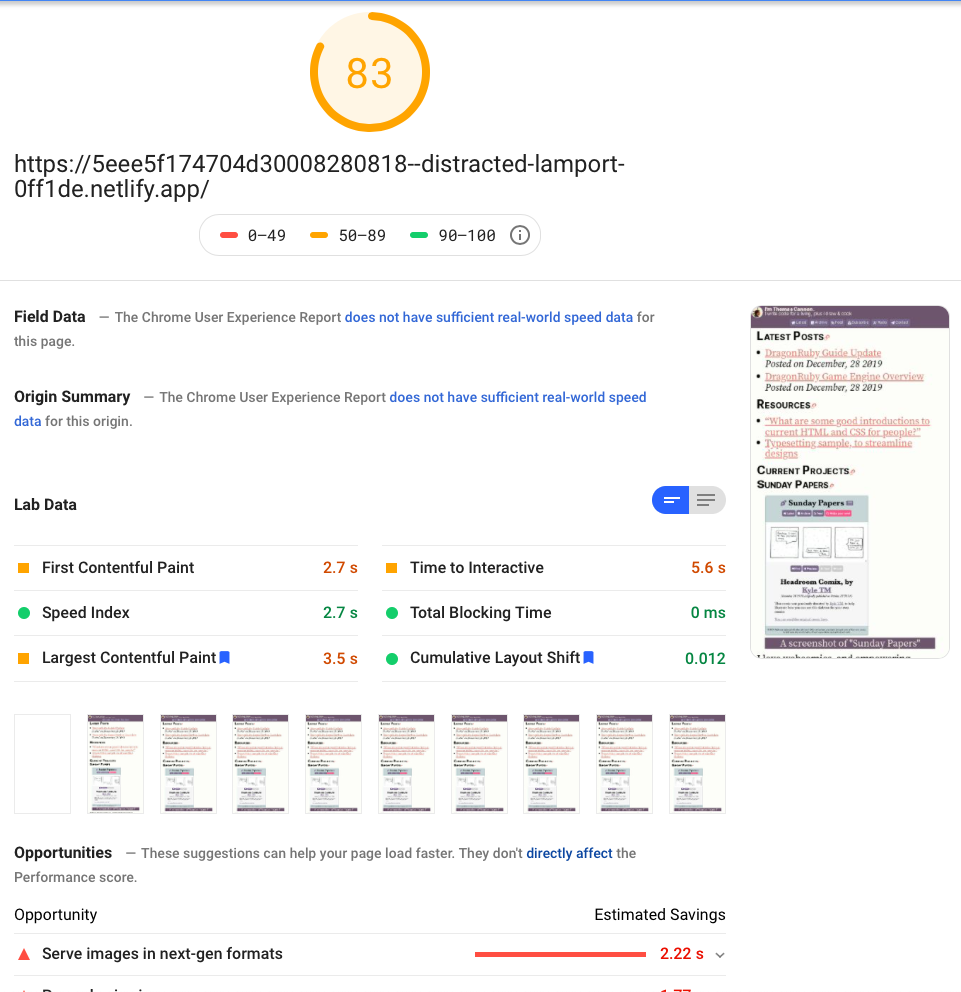
You can actually run the Pagespeed test for the old version
In digging into the problem, I learned some really interesting stuff about web performance that I wanted to share!
Self-hosting the fonts
The first step was to self-host the fonts, since they’re open-sourced. I created a unified fonts.css file, because font declarations are verbose, and non-essential to getting your site readable ASAP.
Resize your images, and choose the right formats!
My profile picture was way too big! Make sure your image sizes are sane for their use case.
I also switched the Sunday Pages sample image to be a JPEG, because the image is relatively small and the filesize/compression was better.
Preloading assets using <link rel="preload">, @import woes
I hadn’t known about preloading until this morning, until I found this freeCodeCamp blog post about webfont performance.
If you’ve never used it, I’d highly recommend checking it out! It could definitely help improve the performance some of your pages by: giving the browser a heads up on any images, stylesheets, scripts, videos that will be in the page.
My first pass was to declare the preload hints as separate link elements (everything was defined as @imports in stylesheet.css):
<link rel="preload" href="/assets/2018-profile.jpg" as="image">
<link rel="preload" href="/assets/fonts/Inter.var.woff2" as="font">
<link rel="preload" href="/assets/fonts/WOFF2/VAR/SourceSerifVariable-Italic.ttf.woff2" as="font">
<link rel="preload" href="/assets/fonts/WOFF2/VAR/SourceSerifVariable-Roman.ttf.woff2" as="font">

<link rel="preload" href="/assets/mexico-light.css" as="style">
<link rel="preload" href="/assets/porple.css" as="style">
<link rel="preload" href="/assets/fonts/fonts.css" as="style">

<link rel="stylesheet" href="/assets/stylesheet.css" type="text/css">

<script src="https://kit.fontawesome.com/9c06318072.js" crossorigin="anonymous" async defer></script>
However, this didn’t actually help anything, because of how Netlify handles asset optimization. Essentially: these individual preload declarations were being rewritten with unique Cloudfront URLs and were not actually affecting the original stylesheet load (in fact, they were causing the assets to load twice! 😱). And the font files were rewritten to Cloudfront URLs that didn’t match the stylesheets.
The solve
I moved everything from @import declarations (which cannot be downloaded until the whole stylesheet is downloaded) into classic <link> elements.
Fixing the useless preloads was actually a good example of reading the spec and understanding how browsers work under the hood. The final version of my <link> elements is:
<link importance="high" rel="stylesheet preload" href="/assets/stylesheet.css" type="text/css" as="style">
<link importance="high" rel="stylesheet preload" href="/assets/svg-with-js.css" type="text/css" as="style">
<link importance="low" rel="stylesheet preload" href="/assets/fonts/fonts.css" type="text/css" as="style">
<link importance="low" rel="stylesheet preload" href="/assets/mexico-light.css" type="text/css" as="style">
<link importance="low" rel="stylesheet preload" href="/assets/porple.css" type="text/css" media="(prefers-color-scheme: dark)" as="style">
I hadn’t realized that the rel can actually support multiple flags. So setting stylesheet preload tells the browser that:
- This is a stylesheet
- You should preload this asset (you’ll also need to set the
asattribute)
The importance attribute helps prioritize between what affects the layout and less-important styling (like custom fonts, or syntax highlighting)
Another useful thing I learned is the media attribute can accept media queries! This means that I could tell the browser to only load/apply the dark-mode syntax highlighting (porple.css) if the browser is running in dark mode.
I’d highly recommend brushing up on the <link> documentation
Embedding Fontawesome SVGs
I also noticed that Font Awesome was generating a lot of requests, for what ultimately leads up to < 10 icons.
I crunched the numbers, and, uh…
Font Awesome performance impact June 21, 2020 at 4:58:04 PM | ||
| 1 |
| 59.86 kB |
| 2 |
| 5,559 B |
| 3 | ||
| 4 |
| 802.7 kB |
| 5 | ||
| 6 |
| 7.457% |
| 7 |
| 0.6925% |
| 8 | ||
| 9 |
| 1,077% |
| Total: | ||
So yeah, that was unacceptable.
The solve
- Downloaded the local package that Font Awesome Provides
- Grabbed the SVG files I was actually using
- Wrote a helper method in Nanoc to embed the SVGs into the page source itself
def embedded_fontawesome(name)
  File.read("static/font-awesome/#{name}.svg")
end

# <li><a href="/"><.. embedded_fontawesome(...) ..> Latest</a></li>
The End result: 100%
Now the PageSpeed rating is 100%, and the site loads immediately on mobile!
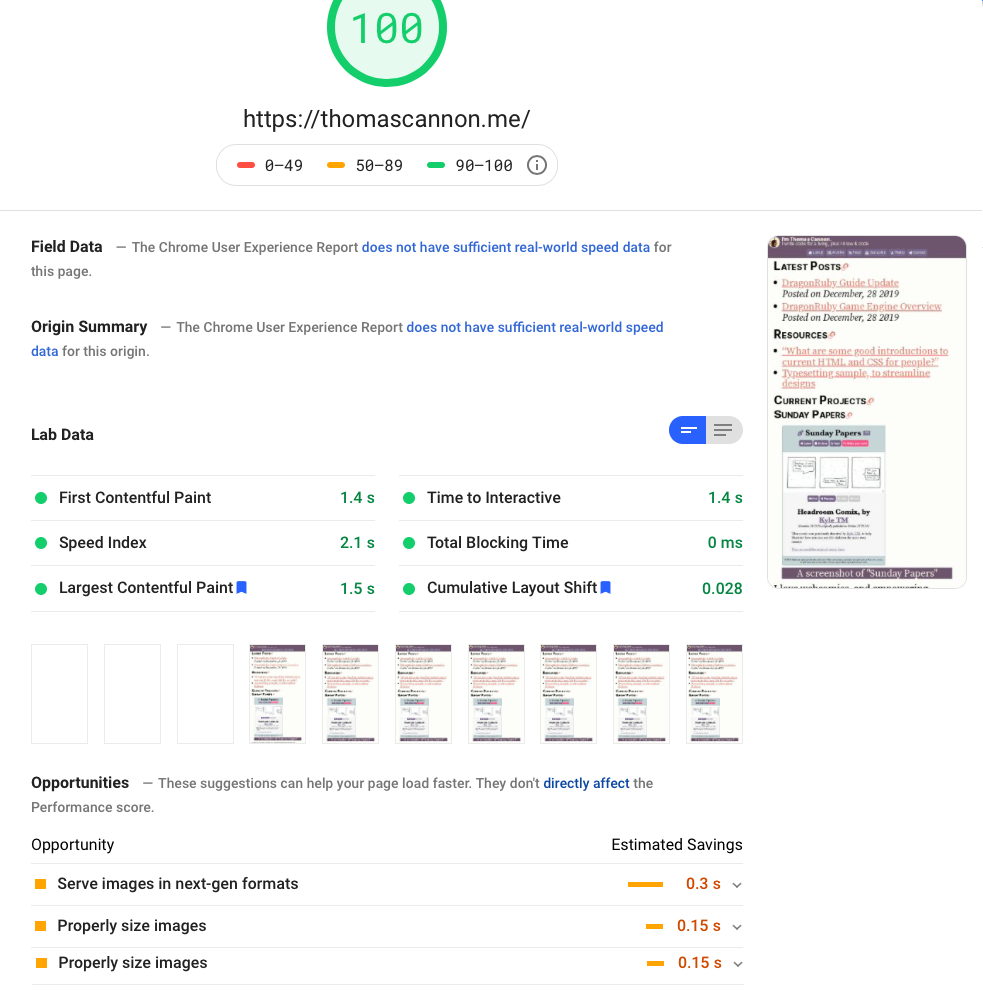
You can actually run the Pagespeed test for the new version
Even with a large, automatically optimized page (with gaps), the performance only drops a bit:
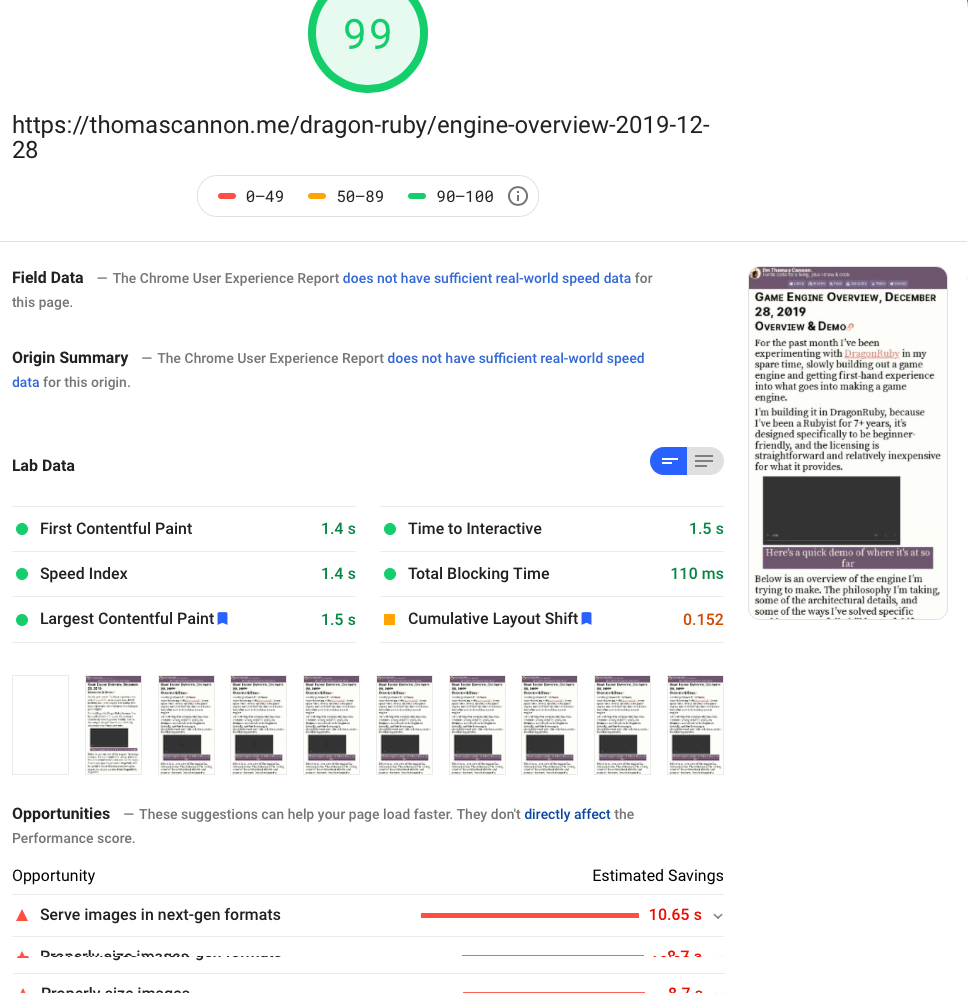
You can actually run the Pagespeed test for this example
Aside: performantly generating client-side header links
Kramdown doesn’t support adding links to headers (even though it does generate header IDs). My eventual goal is to extend the renderer to support that, but that’s another pass.
In the meantime, I wrote a quick javascript handler to do the job for me:
<template id="link-template"><!--embedded_fontawesome("link-duotone")--></template>
document.addEventListener('readystatechange', function(event){
  if(event.target.readyState != 'interactive'){ return }

  var anchorIconTemplate = document.querySelector('#link-template')
  document.querySelectorAll("h1,h2,h3,h4,h5,h6").forEach(function(element){
    if(element.id == ""){ return }

    let anchor = document.createElement("a")
    anchor.href = `#${element.id}`
    anchor.append(anchorIconTemplate.content.cloneNode(true))
    element.append(anchor)
  })
})
Why did I use readstatechange vs. DOMContentLoaded? Because I wanted to insert these elements before the first paint, to improve performance even more:
The readyState of a document can be one of following:
- loading: The document is still loading.
- interactive: The document has finished loading and the document has been parsed but sub-resources such as images, stylesheets and frames are still loading.
- complete: The document and all sub-resources have finished loading. The state indicates that the load event is about to fire.
interactive was the golden ticket here, along with defining the link SVG as a <template> so the browser can reuse it.
The takeaway
- Spend some time reading browser specs
- Analyze what you really need. Can you drop a dependency? Only extract a subset of what you’re actually using? If so, do that!
- Sweat the small stuff, it does pay off (especially in performance tuning!)