Game Engine Overview, December 28, 2019
Overview & Demo
For the past month I’ve been experimenting with DragonRuby in my spare time, slowly building out a game engine and getting first-hand experience into what goes into making a game engine.
I’m building it in DragonRuby, because I’ve been a Rubyist for 7+ years, it’s designed specifically to be beginner-friendly, and the licensing is straightforward and relatively inexpensive for what it provides.
Below is an overview of the engine I’m trying to make. The philosophy I’m taking, some of the architectural details, and some of the ways I’ve solved specific problems. Hopefully it’ll be useful if you’re building your own game engine, or are just curious about DragonRuby in general.
What kind of game am I trying to make?
I dunno! Right now I’m just working on the foundation, essential stuff that every game needs. I explain this cavalier attitude below.
Table of Contents
Philosophy
Middleware-centric framework
DragonRuby is really interesting as a framework, because it inverts a lot of traditional expectations for a game engine. It only provides the bare essentials for rendering a program on a screen, and you the code what you need, as you need it.
This makes it freeform and super exciting to play with (just like Ruby itself!). I’ve described it as being similar to the early 2000s, when the Web’s specs were small enough that you could feasibly write your own browser.
I feel this section From my DragonRuby guide summarizes it best:
Okay, so how do I make a pretty game in DragonRuby? Sprites are the answer to everything, followed by labels. The other rendering primitives (solids & lines) are only useful from a debugging standpoint. DragonRuby’s design philosophy is:
- Use a separate workflow to generate the assets you need for the game (eg: sprites & sounds)
- Reference all those assets inside your DragonRuby code
- Use DragonRuby as the “glue”. It’s a framework, and will handle rendering the game, giving you simple helpers you can chain together
Since this is a hobby for me, I want it to be fun to build out a game over time. So I’m using proven, high-quality open-source (or low-cost) middleware for a lot of the asset generation and game’s details, and then writing DragonRuby code that ties all the assets together.
Hot-reload as much as possible
One of the most exciting features of DragonRuby is that it has hot-reloading built in: once you save the code, the game is automatically reloaded with the new content. As the engine gets more complex. I want to preserve that as much as possible, because it makes iterating very fun.
No expectations
Again, this is a hobby, so I’m trying not to set any sort of expectations for what it should be, or timelines. I work on it as I have time, and based on what I want to do. Right now that’s a bit tricky because I’m building the foundation, so it’s a lot of “writing ‘boring’ code that doesn’t translate into a playable game” (I love writing this kind of code though). Once I get past the foundational hurdles, things should get more interesting.
Architecture
As the engine stands right now, this is the architecture:
Assets
Graphics (✅)
I’ve been using some free assets from Pixel Frog on itch.io. I know I’ll be using Aseprite to make my own pixel art, because it’s one of the best tools out there for pixel art & sprite editing.
Maps (✅)
I’m using Tiled, which is a fantastic map editor. I’ll go into the details in a later section, but it’s very cool to see a tool like this actively being sponsored as an open-source project.
Dialog (in-progress)
Initially I was thinking of using Yarn, but I wasn’t very happy with the UI once I started doing more with it.
After some more searching, I think I’m going to try ink, which looks much more like my style:
- I prefer writing with markup in flat files (so I can use my own editor and make changes directly)
- It’s proven with 3 published games
- It was specifically designed as a piece of middleware.
Scripting (❓)
I don’t know what I’m going to do for scripting yet. Some ideas:
- JSON or YAML files
- Lua? Lua’s a thing, right?
Music/Sounds (😅)
No idea, to be honest. I don’t know where to begin with this, so I’m saving it for a later version.
Game Code
DragonRuby games have the following pattern:
- the
tickmethod is called 60 times every second. - A standandard game loop is:
- Set up the game (usually only called once)
- Process the player’s inputs
- perform any calculations that are needed
- Render the screen
or, put another way:
def tick(args)
  setup(args)
  inputs(args)
  calc(args)
  render(args)
end
Game Code vs. Engine
The Game Code is what’s written in main.rb, the essential glue that makes the game possible. The Engine is more structured code, broken up into different systems that interact with each other. The Game Code fires off specific methods in the engine, which is how the systems start working.
The Game Code handles:
-
Initializing (& hot reloading) the components of the game engine:
if !args.state.map args.state.map ||= GameMap.new('maps/map-1.json') args.state.player ||= Player.new(0, 0) -
Storing the inputs from the user:
args.state.move_x = 0 #... if args.inputs.keyboard.key_held.right args.state.move_x = 1 end -
Passing the inputs onto the game engine:
def calc(args) args.state.player.move(0, args.state.gravity.calculate_player_delta_y) args.state.player.move(args.state.move_x * 5, args.state.move_y) args.state.world.focus_camera_on_player end -
Triggering a render:
  def render(args)
    args.state.camera.render
    args.outputs.labels << [10, 20, args.gtk.current_framerate.to_i, -5]
  end
I like keeping things inside the Engine, because it helps break the game down into a series of interacting systems, rather than becoming spaghetti code.
Engine
The code I’ve written in DragonRuby ties all the assets together into a cohesive interactive game.
Initially the engine was all written into main.rb, but I eventually broke it up into smaller files, because that’s how I like to look at my code. The requires block for the engine gives a pretty good overview of what’s there right now:
require 'app/engine/file_helpers.rb'
require 'app/engine/tile.rb'
require 'app/engine/sprite.rb'
require 'app/engine/animated_sprite.rb'

require 'app/engine/game_map.rb'
require 'app/engine/tileset.rb'
require 'app/engine/collision_layer.rb'
require 'app/engine/game_world.rb'
require 'app/engine/camera.rb'

require 'app/engine/gravity.rb'
require 'app/engine/player.rb'
I’ll try to break down how the major sections work below:
Sprites
There are 2 classes for sprites: Sprite and AnimatedSprite. Whenever I need to add a sprite to the game, I instantiate an instance of one of these 2 classes. They are specifically defined with the attr_sprite declaration that DragonRuby needs to use this instance as a sprite (this fixes a performance issue I ran into when loading a large map):
def initialize(map_x, map_y, sprite_options)
  self.map_x = map_x
  self.map_y = map_y
  self.sprite = Sprite.new(sprite_options)
end
The sprite class is pretty straightforward:
class Sprite
  attr_sprite

  attr_accessor :original_w, :original_h

  def initialize(options)
    @x = options[:x]
    @y = options[:y]
    @w = options[:w]
    @h = options[:h]
    @r = options[:r]
    @g = options[:g]
    @b = options[:b]
    @a = options[:a]
    @tile_x = options[:tile_x]
    @tile_y = options[:tile_y]
    @tile_w = options[:tile_w]
    @tile_h = options[:tile_h]
    @angle = options[:angle]
    @angle_anchor_x = options[:angle_anchor_x]
    @angle_anchor_y = options[:angle_anchor_y]
    @flip_horizontally = options[:flip_horizontally]
    @flip_vertically = options[:flip_vertically]
    @path = options[:path]

    self.original_w = @w
    self.original_h = @h
  end

  # more on these later

  def scale!(scale_factor)
    @w = original_w * scale_factor
    @h = original_h * scale_factor
  end

  def set_frame!
    return nil
  end
end
AnimatedSprite is a subclass of Sprite, with some additional options to support animation, which I pulled from the same sample code that DragonRuby comes with:
class AnimatedSprite < Sprite
  attr_accessor :number_of_sprites,
    :number_of_frames_to_show_each_sprite,
    :start_looping_at,
    :looping_sprite

  def initialize(options)
    super

    self.start_looping_at = options[:start_looping_at] || 0
    self.looping_sprite = options[:looping_sprite] || false

    self.number_of_sprites = options[:number_of_sprites]
    self.number_of_frames_to_show_each_sprite = options[:number_of_frames_to_show_each_sprite]
  end

  def set_frame!
    frame = start_looping_at.frame_index(
      number_of_sprites,
      number_of_frames_to_show_each_sprite,
      looping_sprite
    )

    return if frame.nil?

    self.tile_x = frame * self.tile_w
  end
end
Sprite also has a set_frame! method, which returns nil; so that I can easily update both types of sprite in the rendering loop
I’ll get into scale! later. It’s part of how the game is actually rendered on the screen (but it can also be used for other purposes, like enlarging a player after they use a power-up)
Loading Tiled maps & tilesets
I’m writing my own parse for Tiled files, because they export as JSON and the spec is pretty straightforward
The Tiled code is its own sub-engine, with the following structure:
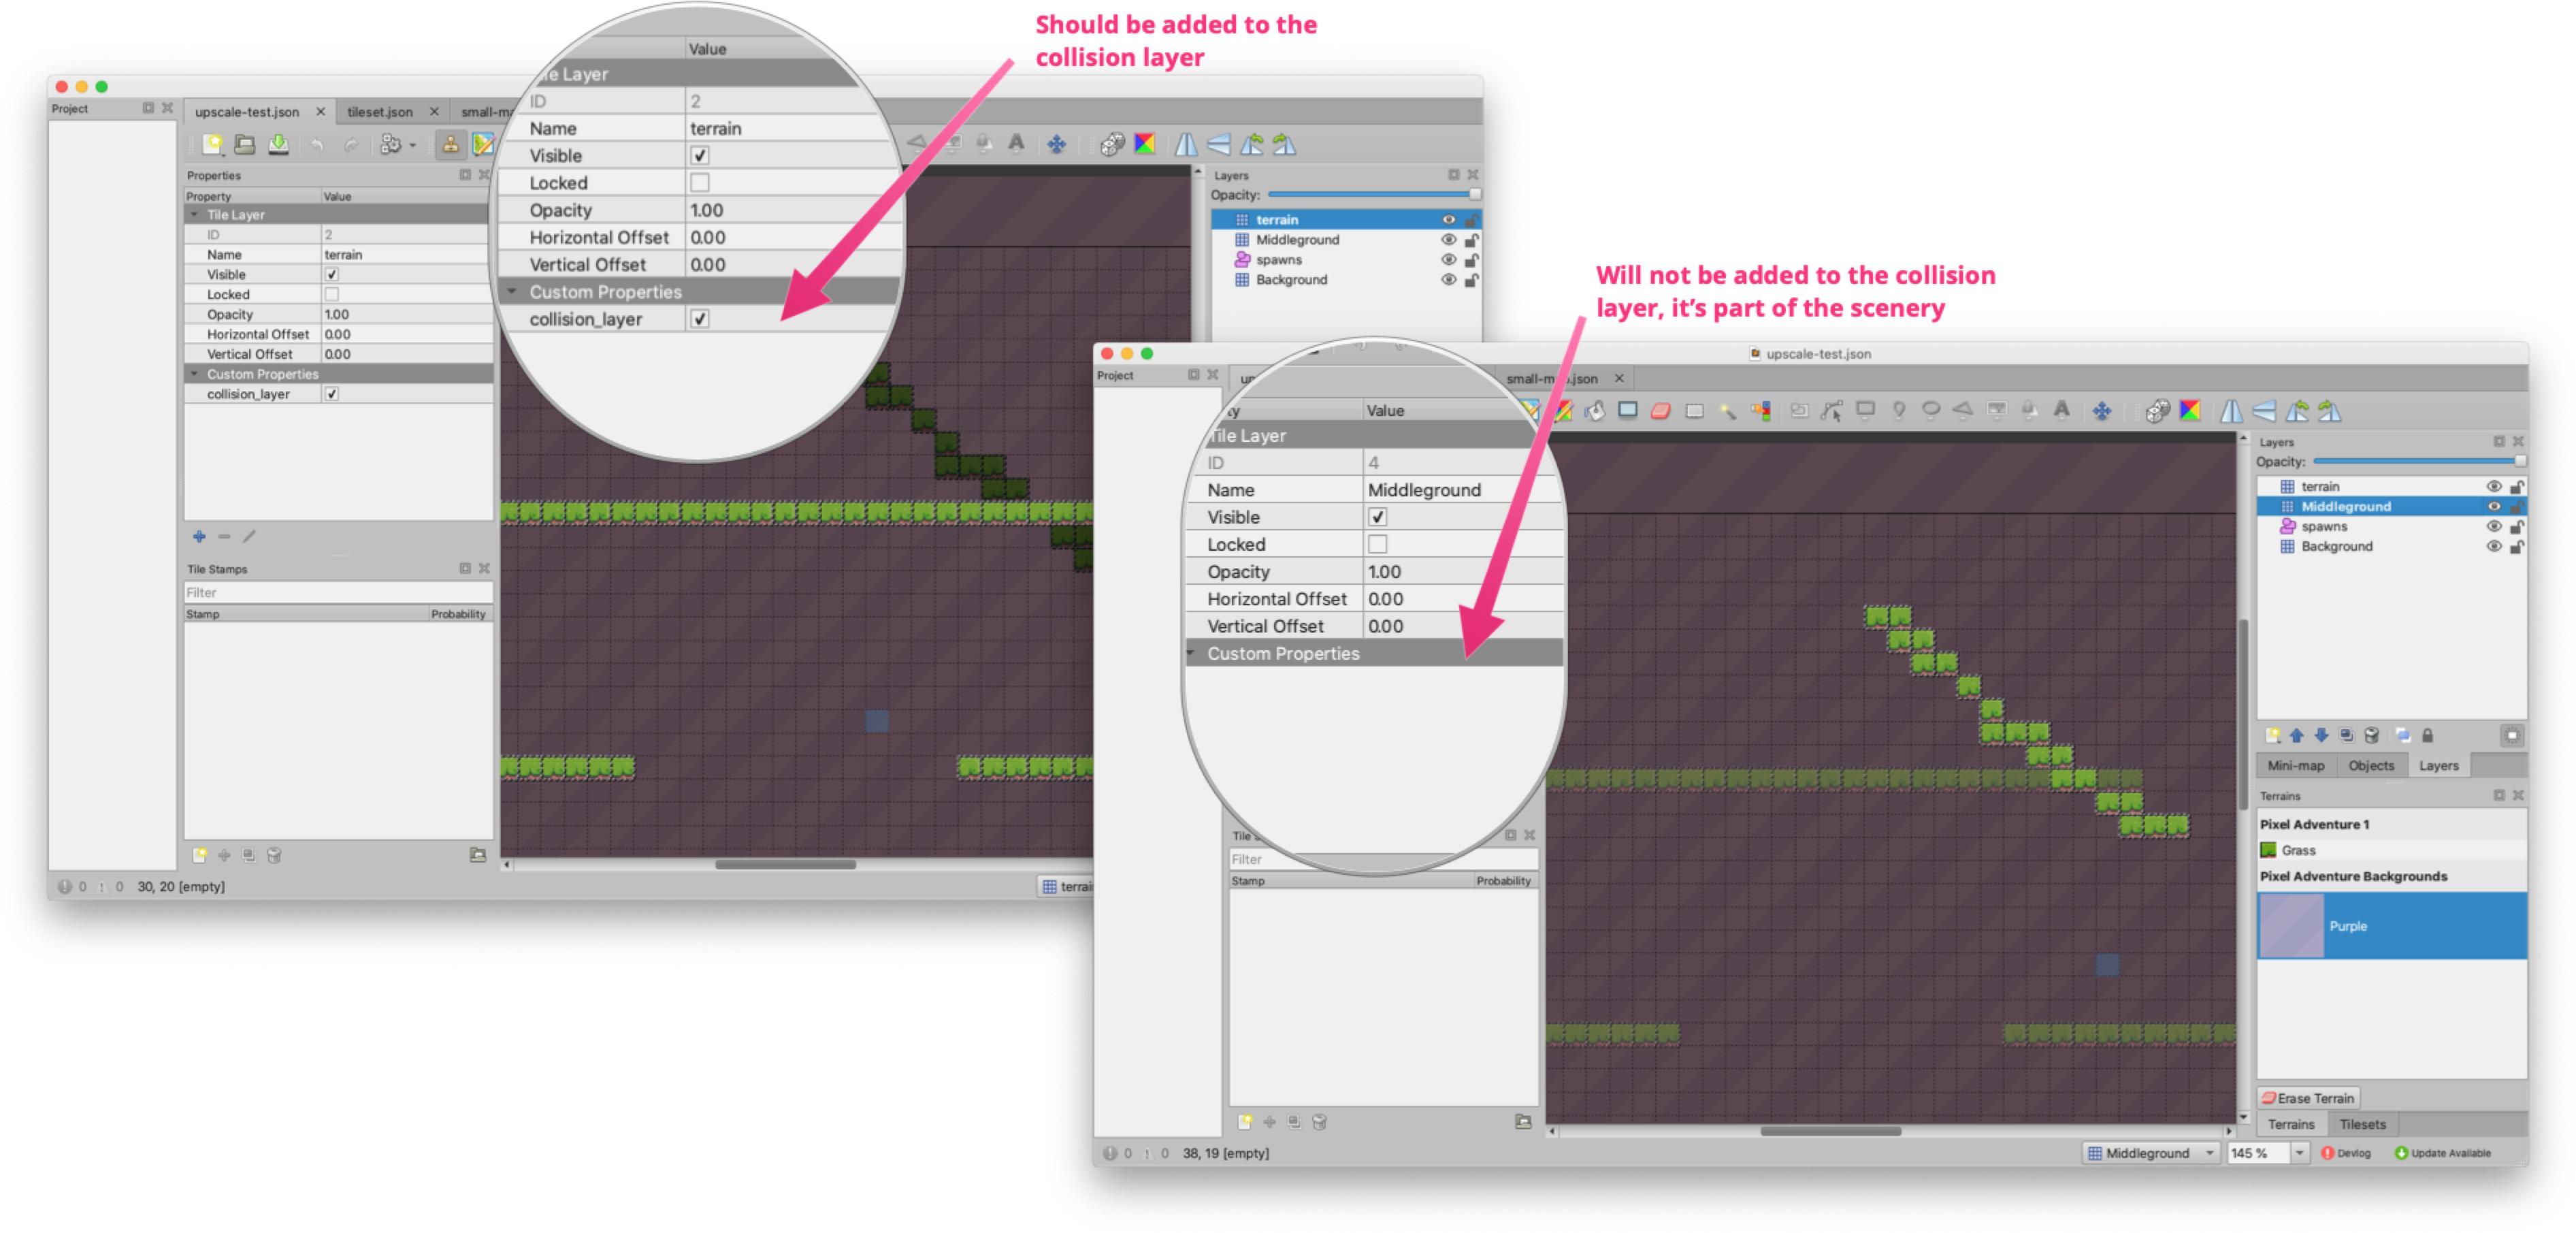
Tilesets: defines the tiles that make up maps, including collision data for each tile and other metadata.GameMap: an actual map I built (think World 1-1)- layers: there are multiple types of layers in a Tiled map, the ones I’m using now are:
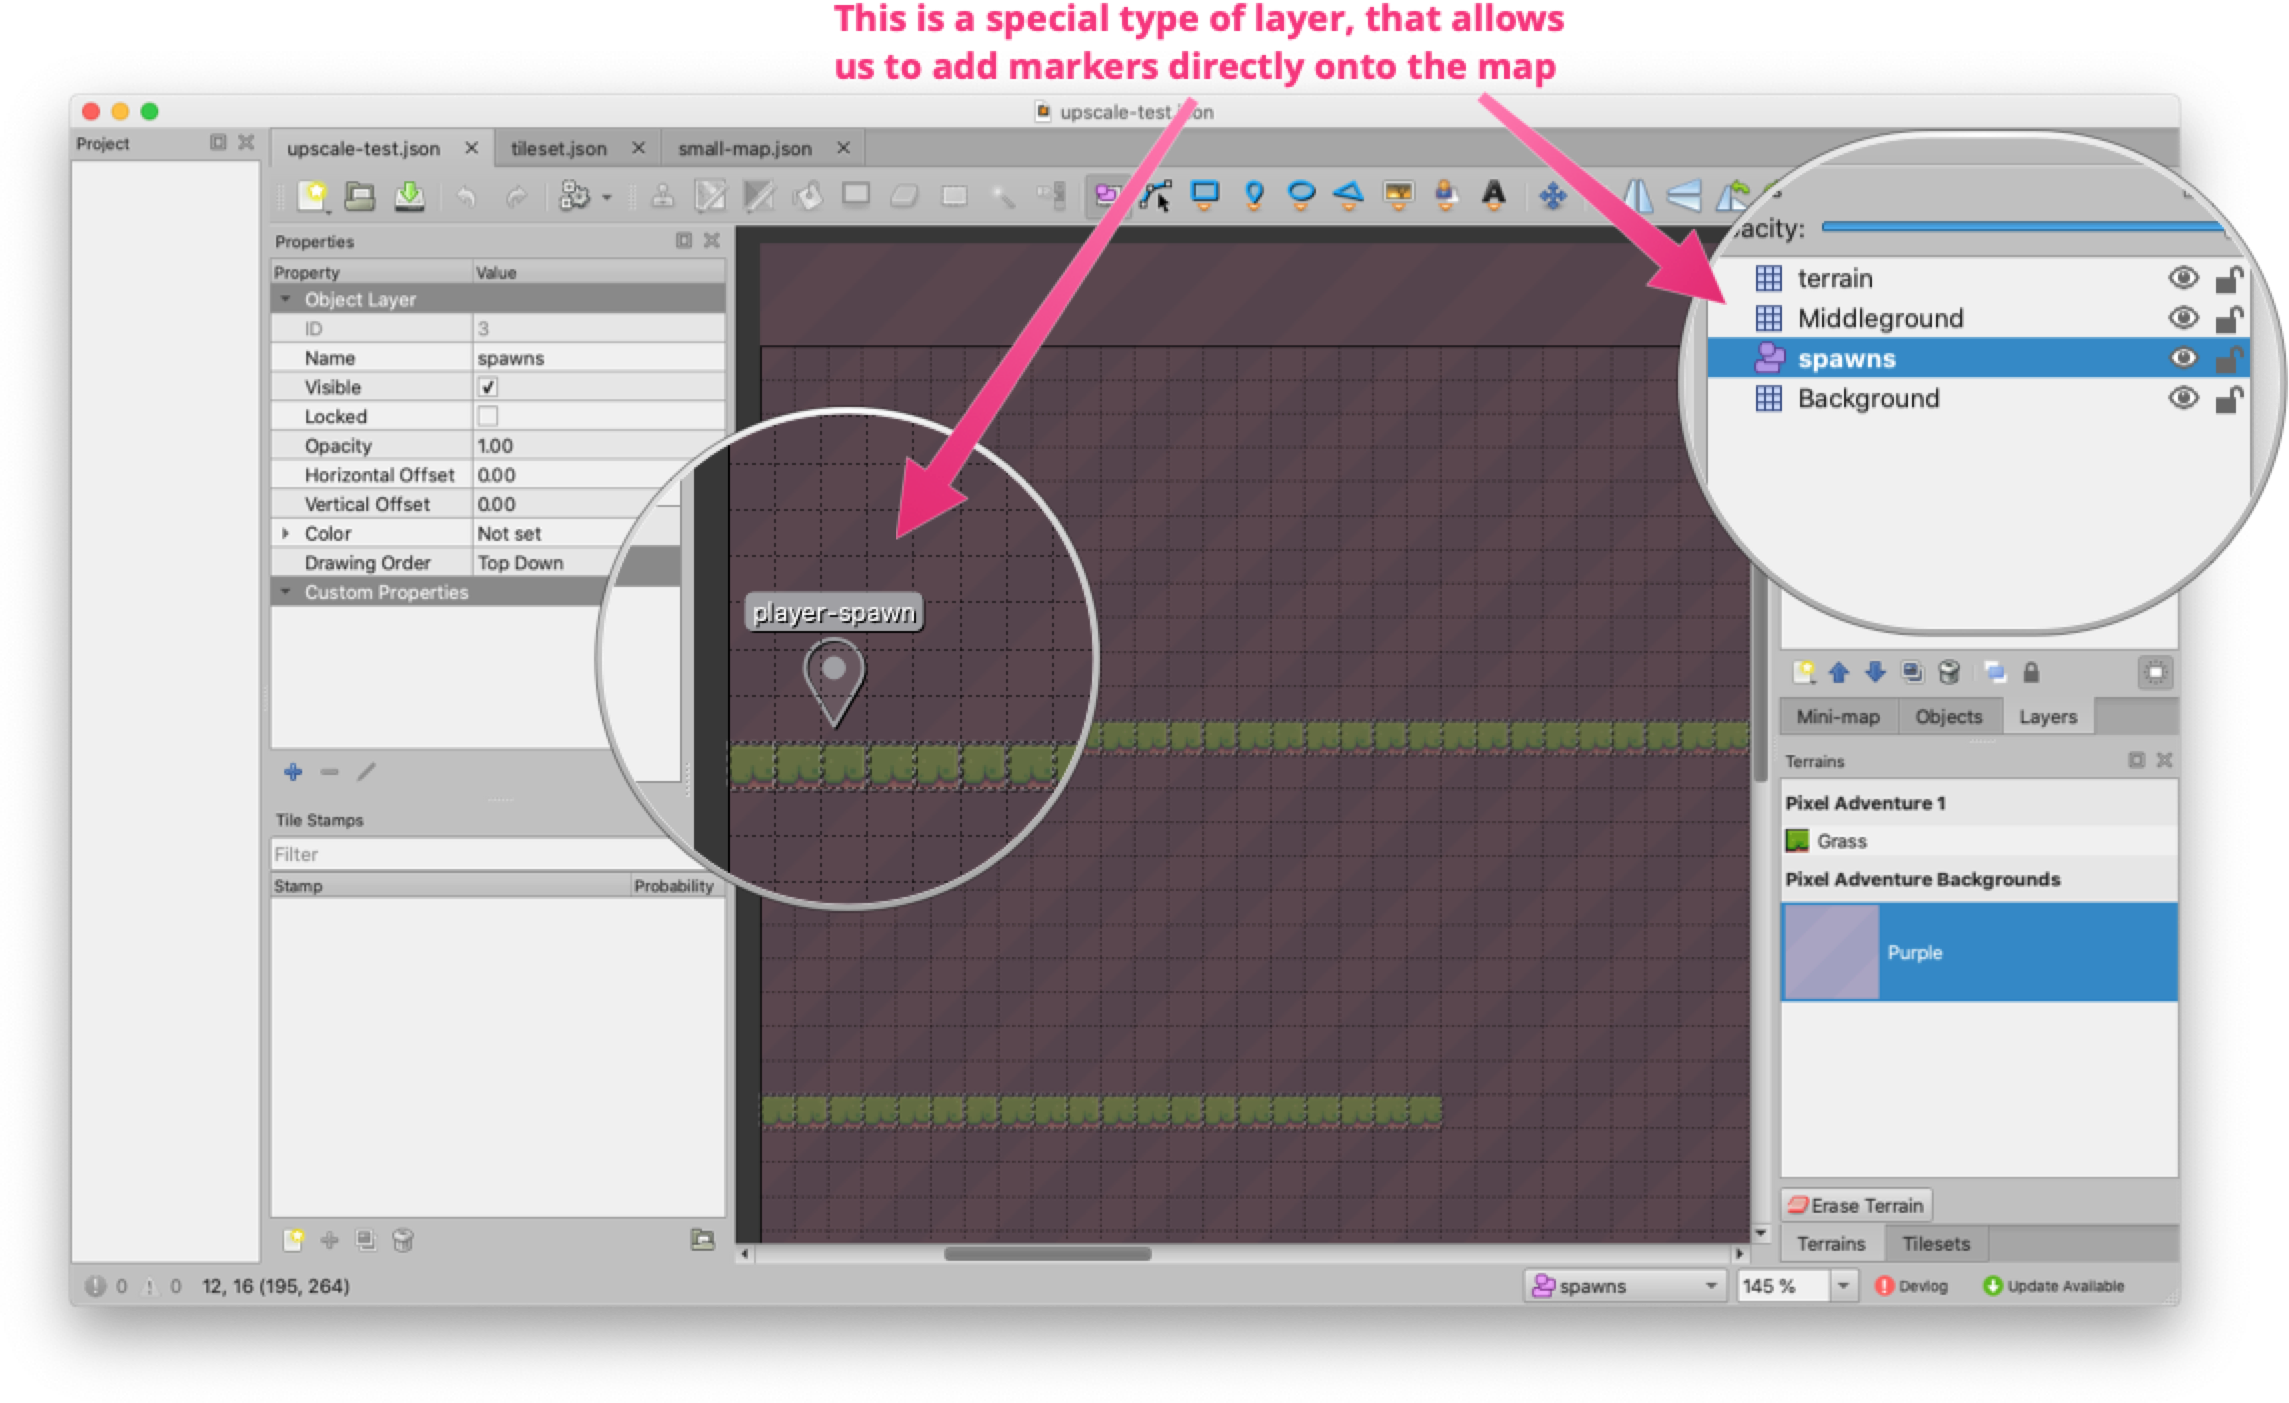
spawns: an Object Layer, with markers for various spawn points (right now, there’s only aplayer-spawn)- tile layers: the layers of actual tiles that make up a map
- There can be any number of tile layers on a map. I only build a collision layer using layers that have the custom
collision_layerflag set totrue
- There can be any number of tile layers on a map. I only build a collision layer using layers that have the custom
GameMapalso contains helper methods to look up the sprite options, which I use when building aTile
- layers: there are multiple types of layers in a Tiled map, the ones I’m using now are:
Player
The player class is pretty rudimentary right now. When Player is instantiated, it is positioned in the game world’s X/Y coordinates (more on this later). It also sets up all the sprites that will be needed, so I don’t have to prepare them during a rendering cycle.
I made sure to have 2 types of movement methods:
reposition(x,y): move the player to a specific X/Y coordinate, immediatelymove(delta_x, delta_y): this is a relative movement. It factors in the previous direction, if the player is jumping, etc. to come up with a final X/Y position to send toreposition
This allows me to reuse the same logic when positioning on my own, or animating the player based on the inputs.
GameWorld
GameWorld is a central class that ties everything together. It hold references to:
- The
Playerinstance - The
GameMap - The
Camera(more on this later) - A
CollisionLayerit generates for the map - The cached
Tileinstances that will be used when rendering the map.
Setup
When setting up the game world, you need to have an initialized GameMap, Player, and Camera. I didn’t want to overload the class with all of the initialization logic; its purpose is manipulating the existing instances to build the world.
As part of its initialization method it builds the tile cache, based on the layers of the GameMap. The structure of the method is:
- Check that the layer is visible and has data
- Get the positioning, opacity, and dimensions of the layer
- Check if this layer should be added to the collision layer
- For the layer’s
dataarray: - Split the array into rows, based on the layer’s width
- Iterate through each row, and for each column:
1. Calculate the tile’s x/y position in the game world
2. Get the tile’s sprite options
3. Add the tile to the
cached_tiles4. Apply the tile to the collision layer, if necessary
The Game World’s coordinate system, and the Camera
There are actually 2 coordinate systems that are in the game engine:
- The coordinates of the map, and all the entities inside of it (the Game World coordinates)
- The coordinates of what’s rendered on the screen (the camera coordinates)
I hate working in multiple coordinate systems, so I use the game world for everything, and try to move everything over to the camera coordinates as late as possible.
The Camera has the following properties:
- The dimensions of the window (the pixels the camera’s viewport takes up in the game window)
- The width/height of the camera’s window
- The scale of the window (is the window 1x the game world? 2x? This allows you to zoom in and out if needed)
- The position of the camera in the Game World’s coordinates
- References to the
GameWorldand the all-necessaryargsobject in DragonRuby
The camera is actually what handles rendering the world onto the screen:
def render
  render_intersecting_tiles
  render_player
end
Translating the game world into the camera
The camera has an area that it covers in the Game World’s coordinate space, which I’ve called camera_box:
def world_width
  @world_width ||= width/window_scale.abs
end

def world_height
  @world_height ||= height/window_scale.abs
end

# The camera box needs to be inversely scaled, since it's either
# zooming in, or zooming out of the map
def camera_box
  [world_x, world_y, world_width, world_height]
end
We can use camera_box to determine what tiles intersect with the camera’s viewport, and only render those ones. The structure of the method is:
- For each of the world’s
GameWorld.cached_tiles: - Get the rectangle that defines the tile, scaled the to match the window’s scale (using
Tile.dimensions) - Check if the tile intersects with the
camera_boxIf so: 3. Convert the tile’s Game World X/Y coordinates into the Camera’s X/Y coordinates, giving us thesprite_x/y4. Position theTile.spritebased on thesprite_x/y5. Calltile.sprite.scale!(window_scale)to scale the tile 6. Render the tile
Below is the full class, if you’re curious:
Camera Class
class Camera
  attr_accessor :window_x, :window_y, :window_scale, :world_x, :world_y, :width, :height, :world, :args

  def draw_debug_border
    args.outputs.borders << [window_x, window_y, width, height]
  end

  def initialize(window_x, window_y, window_scale, world_x, world_y, width, height, world, args)
    self.window_x = window_x
    self.window_y = window_y
    self.window_scale = window_scale
    self.world_x = world_x
    self.world_y = world_y
    self.width = width
    self.height = height
    self.world = world
    self.args = args
  end

  def render
    render_intersecting_tiles
    render_player
  end

  def world_width
    @world_width ||= width/window_scale.abs
  end

  def world_height
    @world_height ||= height/window_scale.abs
  end

  # The camera box needs to be inversely scaled, since it's either
  # zooming in, or zooming out of the map
  def camera_box
    [world_x, world_y, world_width, world_height]
  end

  # Get the relative position of the tile (relative to the camera
        # then add the x/y that the camera is offset from the window itself
  def convert_x_coordinate(given_world_x)
    ((given_world_x - self.world_x) * self.window_scale) + self.window_x
  end

  def convert_y_coordinate(given_world_y)
    ((given_world_y - self.world_y) * self.window_scale) + self.window_y
  end

  def render_player
    world.player.update_sprite(convert_x_coordinate(world.player.x),  convert_y_coordinate(world.player.y))
    world.player.sprite_for_render.scale!(window_scale)
    args.outputs.sprites << world.player.sprite_for_render
  end

  def render_intersecting_tiles
    world.cached_tiles.each do |tile|
      # Currently just render the whole map for debugging purposes
      if tile.dimensions(window_scale).intersect_rect?(camera_box)
        sprite_x = convert_x_coordinate(tile.map_x)
        sprite_y = convert_y_coordinate(tile.map_y)

        tile.sprite.x = sprite_x
        tile.sprite.y = sprite_y

        tile.sprite.scale!(window_scale)
        args.outputs.sprites << tile.sprite
      end
    end
  end
end
CollisionLayer (in-progress)
When loading a map, I add tiles to the CollisionLayer. This creates a series of shapes (usually squares, but I want to support other types in the future) in the game world’s coordinate space.
This class is still in progress. You can see I was experimenting with using a subgrid algorithm to help speed up collision detection, but I removed it until I can revisit the problem.
class CollisionLayer
  attr_accessor :collision_rectangles, :collision_subgrid

  COLLISION_SUBGRID_DIMENSIONS = 300

  def initialize
    self.collision_rectangles = []
    self.collision_subgrid = {}
  end

  def add_collision_shape(shape_details)
    normalized_x = shape_details[:x] + shape_details[:shape_x]
    normalized_y = shape_details[:y] + shape_details[:shape_y]

    rectangle = [normalized_x, normalized_y, shape_details[:shape_width], shape_details[:shape_height]]
    self.collision_rectangles << rectangle
    x_subgrid = subgrid_range(normalized_x)
    y_subgrid = subgrid_range(normalized_y)

    collision_subgrid[x_subgrid] ||= {}
    collision_subgrid[x_subgrid][y_subgrid] ||= []
    collision_subgrid[x_subgrid][y_subgrid] << rectangle
  end

  def subgrid_range(value)
    ((value.to_f/COLLISION_SUBGRID_DIMENSIONS.to_f).floor * COLLISION_SUBGRID_DIMENSIONS) - 1
  end

  def collision?(x, y)
    # x_subgrid = self.collision_subgrid.find{|k,v| k == subgrid_range(x) }
    # return false if x_subgrid.nil?

    # y_subgrid = x_subgrid[1].find{|k,v| k == subgrid_range(y) }
    # return false if y_subgrid.nil?

    collision_rectangles.any?{|rectangle| [x,y].inside_rect?(rectangle)}
  end

  def draw_debug_rects(args)
    self.collision_rectangles.each do |rectangle|
      args.outputs.solids << rectangle
    end
  end

  def self.shape_from_tile(tile_data)
    shape = tile_data["objectgroup"]["objects"].first

    return {
      shape_height: shape["height"],
      shape_width: shape["width"],
      shape_x: shape["x"],
      shape_y: shape["y"],
      shape_rotation: shape["rotation"]
    }
  end
end
When the GameWorld processes the layers in its GameMap, it adds the collision shapes to the collision layer:
# ... game_world.rb
if apply_collision
  collision_shape = map.tile_collision_shape_by_id(tile)
  next if collision_shape.nil?
  collision_shape.merge!({
    x: tile_x,
    y: tile_y,
  })

  collision_layer.add_collision_shape(collision_shape)
end

# ... tileset.rb
def get_tile_collision_shape(id)
  return if self.tiles[id].nil?
  return unless self.tiles[id].has_key?("objectgroup")

  CollisionLayer.shape_from_tile(self.tiles[id])
end
We can then check if there’s a collision at the given x,y coordinates:
collision_layer.collision?(player.x, player.x)
Gravity (in-progress)
The physics engine is very rudimentary, mainly just calculating the player’s delta-y when they jump. This needs expanded.
class Gravity
  attr_accessor :player, :collision_layer

  CONSTANT = -3

  def initialize(player, collision_layer)
    self.player = player
    self.collision_layer = collision_layer
  end

  def calculate_player_delta_y
    return 0 if collision_layer.collision?(player.x, player.y)
    CONSTANT
  end
end